ROM Hacking a Game Boy Game
This post covers the ROM hacking of Game Boy games. It is designed as a comprehensive, in-depth guide that covers everything from simple to advanced ROM hacks as well as the closely related reverse engineering. As a practical example, this guide is accompanied by the Game Boy game “Disney’s The Jungle Book” from 1994 - a game on which I spent more than 200 hours of reverse-engineering and ROM hacking. You are probably already familiar with the term “ROM hacking” (why else would you be here?), but anyway, let’s start at the very beginning…
What is ROM hacking?
ROM hacking refers to the process of changing software for legacy consoles (NES, SNES, Game Boy, etc.).
It is also often referred to as ROM patching, or ROM modding.
The term ROM (Read-Only Memory) is derived from the read-only cartridge memory used by these older consoles.
Reasons for ROM hacking are manyfold: Maybe you want to add cheats, maybe you want to create a translation for a game that was only released in Japanese,
maybe you want to add new levels - the ways of altering your favorite game are endless.
Do I need to be an experienced programmer?
The difficulty of your ROM hack primarily depends on your ambitions.
Simple hacks can be learned and understood by beginners with little programming experience in a few minutes.
More elaborated projects may require good knowledge of the Game Boy CPU’s assembly language (Z80-like), the Game Boy’s hardware, and algorithms in general.
Some examples of easy and hard projects are provided in the following.
Is there anything I need?
Besides the ROM that you want to hack (more on that shortly), there is not much you need.
I highly recommend a Linux system for ROM hacking, but many of the used tools work on other operating systems as well.
If you are on Windows, you can simply use WSL2 to get a Linux environment.
Contents
1. Overview
Before starting with ROM hacks, you need the content of a Game Boy cartridge in a computer-readable form. There are two ways of getting there.
First, you can use a cartridge reader, such as GBxCart. Among other things, it allows you to dump the bits and bytes of a Game Boy cartridge directly on your PC using a USB connection.
Second, if you don’t want to spend money on a cartridge reader, you may resort to certain websites to download a ROM file. But beware: if you do not own the downloaded game, this is illegal in many jurisdictions. And even if you own it, some countries may still regard downloading/distributing ROMs as a copyright violation.
So, assuming you somehow got a ROM file, let’s quickly talk about expectation management and difficulty of ROM hacks.
2. Expectation Management
Before starting your own ROM hacking project it is extremely important to reflect on your goals. Depending on the difficulty of your goal, a project can be concluded within minutes or it might take thousands of hours! To give you some examples.
Imagine you want to hack a ROM, such that the player has an infinite number of lives.
In most games, the number of lives is located somewhere in the Game Boy’s RAM at a fixed address.
If you can prevent the game from decrementing the value at said address, then you have an infinite number of lives - congrats!
But how does one get the address of the number of lives?
The easiest way to find it, would be to use the game’s original source code and search for variables like NumLives, number_of_lives, and so forth.
Usually it’s a matter of minutes to locate points of interest, especially for Game Boy games which are relatively little in size.
Unfortunately, most developers do not publish a game’s source code, so you either rely on a community-based reverse-engineering project
or you start your own reverse-engineering project.
Telling from awesome-gb-dev, there are around 15 reverse-engineered Game Boy games (also called disassemblies) available.
This is a fraction of the more than 1000 released Game Boy games.
So, if your to-be-hacked game isn’t one of the most popular games, you likely have to do the reverse-engineering yourself.
But luckily, for small changes, it is not always necessary to have the full source code.
I will show some techniques later, which usually achieve the goal in minutes or hours.
Ok, that was an “easy” project. Now let’s maximize the difficulty of your goal by saying you want to add an extra level to a game. This is the point at which I would say: It’s practically impossible without having the source code. Because first, you need to understand how the game stores, loads, and handles levels. Next, you need to design your own level, which might be very tedious work if you don’t write aids like a level editor. Lastly, you need to add the level to the game and recompile it. With Game Boy games often being heavily optimized for size, the resulting spaghetti code quickly breaks when adding a few bits here and there. So, you might end up fixing tons of other things as well. Including the reverse-engineering, your project may easily require 1000+ hours, even if you are an experienced programmer.
Since reverse-engineering is likely a fundamental part of your ROM hacking project, the next section highlights it in greater detail. If you already have the source code, feel free to skip the next section.
3. Reverse Engineering
When software developers create software, they usually code something in a high-level programming language (C, C++, Rust, etc.). Once the code is ready to be deployed or tested, it is compiled into something a computer can execute. Unless you are working with interpreted languages (like Python), the compiled result is a so-called binary, comprising bytes ready to be fed into your CPU.
The goal of software reverse engineering is to reverse this process by taking a binary and transforming it back into source code. Unfortunately, most important meta-information (variable and function names, comments, code layout, etc.) gets lost during the compilation process. So, it is nearly impossible to recreate the original source. But that is not necessarily a bad thing: Maybe your reverse-engineered source code is better than the original ones, and if you planned to make it publicly available releasing the original source is not an option anyway due to copyright protections.
Let us now take a look at how this reverse-engineering process specifically looks like for the Game Boy.
Assuming you have the ROM file of your favorite game available, mapping the machine code in the ROM file to human-readable assembly language
is actually very simple.
Just use the open-source tool mgbdis.
It’s a Python script that converts your ROM file into several .asm files and a Makefile.
The assembly files can be converted back to an executable ROM file by executing the Makefile.
Note that the Makefile uses rgbds, which needs to be installed on your system.
Here’s how to do it in detail on Linux:
> cd mgbdis
> python3 mgbdis.py jungle_book.gb
> cd disassembly/
> ls
bank_000.asm  bank_002.asm  bank_004.asm  bank_006.asm  game.asm  hardware.inc
bank_001.asm  bank_003.asm  bank_005.asm  bank_007.asm  gfx/      Makefile
> make
If you now look into the .asm files, you find a lot of Game Boy/Z80-like assembly .
But how does one get that to a typical high-level language like C or C++?
Well, I have a good and a bad message:
The good message is that we don’t have to deal with uplifting the assembly to a high-level programming as most Game Boy games were programmed in assembly.
The bad message is that we have to deal with assembly.
Since we already arrived at our target programming language, we can now focus on the core tasks of reverse engineering:
- Giving names to labels and variables
- Resolving magic numbers
- Separating data and code segments
- Writing macros if you are feeling fancy.
Before diving into the details of reverse-engineering, I want to give you a rough idea of how much effort is involved.
3.1 Effort Estimate
Although reverse engineering is a lot of fun, it can be equally a lot of work. To give you an intuition of how much work may be involved, consider my case of reverse-engineering “The Jungle Book”:
Using the Linux tool cloc, I count roughly 22,000 software lines of code (SLOC). Some of that is data, but most big data chunks are separated in external files. Of these 22,000 lines, ca. 90% received a semantic labeling by me. I didn’t do exact measurements, but on average I need something like 1 hour for 100 lines of code. Overall, it means that I spent more than 150 hours on reverse-engineering this game, which matches my gut feeling very well. Including tools and these blog posts I write, my total time spent on this game likely exceeds 200 hours.
Ultimately, the time spent reverse-engineering a game probably correlates very linearly with its size. So, I took a look at some open-source Game Boy game reverse-engineering projects, to see how much SLOC and effort they involve. Note that many projects aren’t completely reverse-engineered, which may lead to some data being included in the SLOC counting. Here’s the list:
| Game | Cartridge Size | kSLOC | Release | Contributors | Effort estimate |
|---|---|---|---|---|---|
| Tetris | 32 KiB | 13.5 | 1989 | 1 | 135 hours |
| Super Mario Land | 64 KiB | 14 | 1989 | 2 | 140 hours |
| The Jungle Book | 128 KiB | 22 | 1994 | 1 | 220 hours |
| Final Fantasy Adventure | 256 KiB | 79 | 1991 | 4 | 790 hours |
| Kirby’s Dream Land | 256 KiB | 89 | 1992 | 2 | 890 hours |
| Super Mario Land 2 | 512 KiB | 37.5 | 1992 | 1 | 375 hours |
| Mole Mania | 512 KiB | 74.5 | 1996 | 1 | 745 hours |
| Donkey Kong | 512 KiB | 103 | 1994 | 1 | 1030 hours |
| Pokémon Red | 1024 KiB | 150 | 1996 | 55 | 1500 hours |
As you can see, with only 22 kSLOC, my reverse-engineering project is rather in the lower half in terms of complexity. Other projects, like Pokémon for instance, comprise more than 100 kSLOC! So, I guess the two major conclusion points of this subsection are:
- Even if you are 10x faster than I am: Fully reverse-engineering a Game Boy game is likely in the order of tens to hundreds of hours of work
- The amount of work correlates with cartridge size. For an easy project, maybe consider an older and smaller game.
After this quick effort estimate, let’s get into the nitty-gritty.
3.2 Separating Data and Instructions
Assuming you successfully executed mgbdis as shown above, we now take a closer look at the generated assembly files. For instance, when disassembling the Jungle Book game, I get files which look like this:
    ld c, $0a
    ld hl, $c507
    ld de, $c511

jr_007_40b6:
    ld a, [hl+]
    ld [de], a
    inc de
    dec c
    jr nz, jr_007_40b6
That looks like solid assembly code. If you take a closer look at it, it looks like it is copying something from address $c507 to address $c511. Of course, the generated code uses placeholder labels and there is no semantic information, but the generated code looks meaningful.
Now to another excerpt from the same file:
    nop
    nop
    nop
    sub d
    ld a, h
    inc b
    ld hl, sp+$03
    db $fc
    ld b, $f9
    rrca
That one looks a bit weird. Is the code really executing 3 consecutive nop operations? Is it really incrementing Register b just to overwrite it with $f9?
No, what we actually have here is data. If we are not providing a symbol file to mgbdis, it will simply assume that the whole cartridge comprises instructions. However, there is also data to consider. In fact, for most games the majority of the ROM is occupied by data used for things like sprites, sound tracks, maps, and so forth. That leaves one with the problem of effectively separating data and instructions. Unlike modern file formats like ELF on Linux or .exe on Windows, the Game Boy ROMs are just binary blobs without any metadata that helps to distinguish between data and instructions. A possible method is of course the previous way by inspecting the assembly and decide whether it makes sense or not. If you’d want to do it in a more automated way, I can recommend two approaches.
The first one is executing the game in an emulator and see where it loads and where it executes parts of the cartridge. I implemented such a feature in my Game Boy emulator TLMBoy. But some other emulators like Beaten Dying Moon support that as well. The result is a symbol file with data and instruction sections, which can be fed to mgbdis. For this approach to work sufficiently well, every byte in the executed game needs to be touched at least once. Either by loads/stores or by executing it. In practice, this requires a 100% playthrough that may take multiple hours depending on the game.
Another method requires radare2, which is an extremely useful tool for reverse-engineering in general. The following method only works for strings, but when reverse-engineering, every little aid is welcome. Open your ROM with radare2 as follows:
radare2 jungle_book.gb
Now simply type izzq to list all the strings radare2 can find in your binary:
[0x00000100]> izzq
...
0x172ee 7 6 `h0H0(
0x172f7 6 5 X0X08
0x1733d 6 5 X0X0(
0x1736c 5 4 `h04
0x17415 6 5 X H08
0x1746a 5 4 <| `
0x175d1 23 22  !LICENSED BY NINTENDO
0x175e8 9 8 PRESENTS
0x175f4 37 36 1994 THE WALT\r   DISNEY COMPANY\r\r
0x1761b 98 97 1994 VIRGIN\r    INTERACTIVE\r   ENTERTAINMENT\r\rDEVELOPED BY EUROCOM\r\rPRESS START TO BEGIN\r  LEVEL
0x1767d 10 9  NORMAL
0x17687 9 8 PRACTICE
0x17690 14 13 JUNGLE BY DAY
0x1769e 15 14 THE GREAT TREE
0x176ad 13 12  DAWN PATROL
0x176ba 13 12 BY THE RIVER
...
What you can see above are strings radare2 identified and the corresponding addresses and sizes of the strings.
As you can see for the Jungle Book game, radare2 identifies a lot of false positives (e.g., X0X08 and X H08 are unlikely to be strings).
But occasionally it finds some candidates that are very likely to be strings.
As shown above, radare2 identified the strings of the start screen, as well as the strings for the level names.
The relatively high number of false positives can be explained by radare2’s string-detection algorithm.
Basically, it just looks for printable characters with a minimum length.
Since izz searches the whole file, you get a lot of “strings” just by chance.
If you want to reduce the number of false positives, you may want to play with the minimum string length.
For instance, increase the minimum number to 10 by executing:
e bin.minstr=10
3.3 Labeling Code
The probably most important but also most time-consuming and challenging part of reverse-engineering is labeling. Labeling involves replacing the disassembler-generated placeholder labels by semantic labels as well as assigning variable names to memory addresses. Or in other words: naming things (which is one of the two hardest problems in computer science!). Ultimately, the goal of labeling is simply to make your code more accessible to humans. If you are not too strict with the definition, writing comments or documentation can also be regarded as some kind of labeling.
So, how does one identify labels and variable names? Well, that is the tricky part - there is no golden approach that will lead you to results. Instead, it is a combination of reading the code, debugging, and coming up with creative ideas. Furthermore, to find the name of a label or a variable, there is often no direct path. Rather, you have to solve other parts first and sometimes that brings you to your goal without actively working towards it. I feel like it’s a bit similar to Sudoku, where finding the number of a field is usually achieved by finding the number of other fields first.
To give you an example on how reverse-engineering looks like, let us try to find out where the variable for the number of lives in “The Jungle Book” is. As you can see from the following screenshot, the player starts with 6 lives:
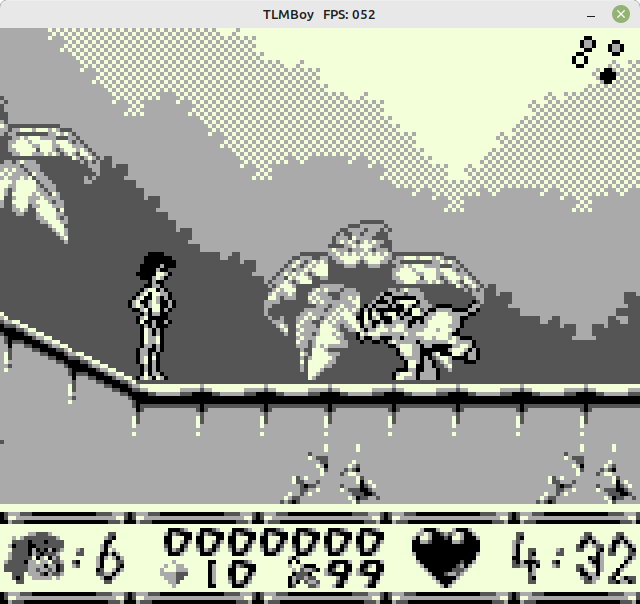
Hence, somewhere in the code the number 6 needs to be loaded into an address, which is likely done by a load or store. The most likely way of doing that probably looks like this ($1234 just as an example address):
ld a, $06
ld [$1234], a
Using a Regex (ld\s\w,\s\$06\n\s+ld\s\[\$\w+\]), you can scan the code to get the following candidates:
$c13d, $c14c, $c15f, $c1b7, $c1fc, $c501.
Next, start the game using a phenomenal debugger called Gearboy. This Game Boy debugger gives you introspection into every tiny bit of the Game Boy including the Game Boy’s working RAM, which is what we are interested in. Because if any of the aforementioned addresses holds the number of lives, it should be “6” during the game’s execution. Furthermore, it should decrement if the player is losing a life. Of all address candidates, only one showed this behavior: $c1b7. Here’s a screenshot showing the memory content using Gearboy’s memory editor:
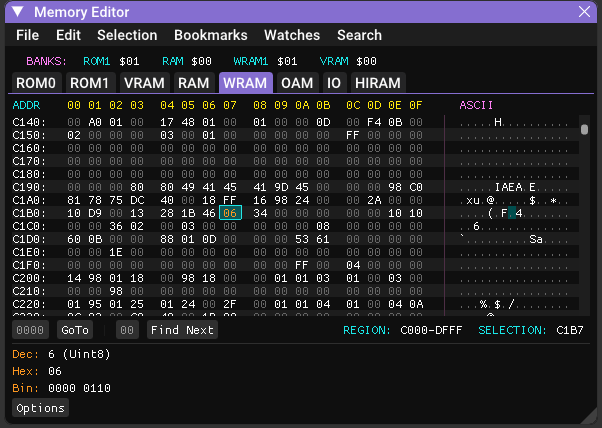
You can now assume with high confidence that $c1b7 holds the player’s number of lives.
In the source code that can be annotated by creating a variable for this address
and a constant to replace the magic number “6”:
def CurrentLives EQU $c1b7
def NUM_LIVES EQU 6
Pretty much all occurrences of $c1b7 in the source code can now be replaced by CurrentLives,
and you can move on to label other parts of the code.
With increasing progress, labeling gets harder and easier at same time. It gets harder because you run out of low-hanging fruits like the example of this subsection. But it also gets easier, because identifying variables provides more context. The next section is something I’d rather skip, but unfortunately it works too well: AI for reverse engineering.
3.4 The Role of AI
With AI becoming more pervasive in a programmer’s everyday life, I was wondering how well AI performs in reverse-engineering. I did some tests with ChatGPT at the start of the project in 2024 with mediocre outcomes (I guess training LLMs on Z80 assembly wasn’t the highest priority), however quite a bit has happened in the meantime. To evaluate the performance of my favourite LLMs, I provided them with some snippets of unreverse-engineered code of which I knew what it was doing.
In particular, I used the DecompressData function of the Jungle Book game, which you can find at the very end of this file. The function uses the LZ77-like algorithm to decompress data from the game’s ROM.
Although the function is relatively small and neatly confined, its hacky implementation was a pain to reverse engineer.
Fully reverse-engineering and understanding it took me multiple hours.
So, can AI do my work in less than a minute? Here are their answers to this request and a subsequent request asking for annotated code with semantic labels:
GPT-5: Short version: it’s a backwards LZ-style decompressor. Annotated code.
Gemini 2.5 Pro: This Z80 assembly code implements a data decompression routine, likely a variant of the LZ77 algorithm. Annotated code.
Claude Sonnet 4.5: This is a data decompression function written in Game Boy (Z80-like) assembly language. It appears to implement a variant of LZ77 or LZSS compression, which is commonly used in Game Boy games to save ROM space. Annotated code.
I was quite impressed to see that all LLMs managed to identify the data decompression algorithm. While Sonnet 4.5 and GPT-5 remained kind of fuzzy concerning the exact algorithm, Gemini 2.5 Pro hit the nail on the head. Also the annotated code of all three LLMs was spot on. So, hours of human work done in a matter of seconds. Even though this seemed super impressive, keep in mind that my project is open source and that it might have been part of the training dataset.
Since it worked so much better than my early attempts in 2024, I decided to use LLMs as a tool from that point on. After a few more hours with LLM-guided reverse-engineering, I have to admit: It can be useful. It was a bit hit-and-miss sometimes but if you thoroughly evaluate the generated answers/code, it can give you a nice performance boost. I really wonder where it will be at in a few years.
4. ROM Hacking
4.1 Simple Hack
Assuming you now have the source code of the game, or at least you know the addresses of certain variables, it’s now time to perform the actual ROM hack. A ROM hack can be performed directly by altering the underlying code, or indirectly by using cheat modules like Game Genie or Game Shark.
Cheat modules do not alter the Game’s binary directly, but whenever the game tries to read from a given address, cheat modules intercept the read and replace the response with a predefined one. In my opinion it’s the easiest way to perform a ROM hack. Also, most emulators support them.
Note: the following code format is the GameShark / Pro Action Replay style used by many Game Boy emulators (Game Genie codes work differently and have a different format). These cheats typically force a value into a RAM address:
01VVAAAA
VV is the 8-bit value, and AAAA is the target address encoded in little-endian order (low byte first).
So, let’s create our own cheat code to make the player in “The Jungle Book” invincible.
In the reverse-engineered source code of the game
you find a function called ReceiveDamage.
; $197d: Input: "c" = damage to receive.
ReceiveDamage::
    ld a, [InvincibilityTimer]  ; a = [$c189]
    or a
    ret nz                      ; Not receiving damage if invincible.
    ...
As you can see from the code, the function returns early if a variable named InvincibilityTimer is non-zero.
So, let’s just set this variable to 1 by using the following cheat code: 010189c1.
Note that the address is encoded in little endian format.
Playing the game with this cheat code confirmed that it actually works:
Mowgli isn’t really impressed by getting attacked by boars and mosquitoes (or whatever these dots are supposed to represent).
Alternatively, if you don’t want to use cheat codes, you can replace the ret nz by an unconditional return ret and recompile the game.
In this particular case, both instructions are 1 byte long, so it’s a safe in-place patch.
But beware, if you change the code in general, you might run into two problems: The first one is missing space in the cartridge. If you add additional bytes, the usually densely packed ROM banks might reach their 16 KiB limit. The second issue occurs if you add or remove bytes. Because any code after your change will be relocated, leading to problems with position-dependent code.
4.2 Medium-difficulty Hack
After this initial simple ROM hack, I want to show a more elaborated example by replacing the boar enemy with a Goomba
from “Super Mario Land 2: 6 Golden Coins”.
Adding instead of replacing is not really an option, because the cartridge is already filled to the brim.
So, first of all, we have to get the Goomba sprites from Super Mario Land.
Luckily, someone already reverse engineered the game including its sprites.
Download the source code here
and take a look at the file gfx/enemies/classic.2bpp.
This 896-byte 2-bits-per-pixel file is where the Goomba sprites live.
To visualize the sprite data, use rgbgfx (which is part of rgbds) with the following command:
rgbgfx --reverse 2 -o classic.2bpp classic.png
The output PNG should look like this:

It takes some imagination, but the Goomba sprites can be spotted at the top of the PNG.
And this is where the first problem already emerges. The Game Boy’s Pixel Processing Unit (PPU) can handle two kinds of sprites: 8x16 and 8x8. Of course “The Jungle Book” uses 8x16 sprites while “Super Mario Land 2” uses 8x8 sprites (at least for the Goombas). Also, “Super Mario Land 2” uses some mirroring tricks that we cannot really use in “The Jungle Book”, the colors need some adjustment, and the size of the tileset needs to be adjusted to fit into the cartridge: So, a little Python script and a bit of tweaking is needed:
cp classic.2bpp GoombaSprites.2bpp
truncate -s 736 GoombaSprites.2bpp
rgbgfx GoombaSprites.2bpp GoombaSprites.png
./convert.py
rgbgfx -o GoombaSprites.2bpp -c dmg=d8 GoombaSprites_swapped.png
To save you the hassle, here’s the new palette:
Next, we need to alter the source code of the Jungle Book game.
Specifically, we need to add the sprite palette to gfx/GoombaSprites.2bpp.
This includes changing the parts where the file is included.
In Bank 5:
; $491c: Replaces the 736 bytes of BoarSprites.2bpp.
GoombaSprites::
    INCBIN "gfx/GoombaSprites.2bpp"
And in Bank 4:
; $7f72: Upper two bits of each pointer + 5 determines ROM bank.
ObjectSpritePointers::
    ; ROM bank 5
    MakeObjSpritePtr 5, AssetSprites                    ; $07
    MakeObjSpritePtr 5, SittingMonkeySprites            ; $08
    MakeObjSpritePtr 5, GoombaSprites                   ; $09
Note that you could also just overwrite gfx/BoarSprites.2bpp with the Goomba’s sprites,
but for this post we go with the clean approach.
Now the game already takes the Goomba’s sprites, but this is by far not sufficient as several other things need to be defined as well.
This includes the frames for an object’s animation.
To let our Goomba walk, we first need to define the sizes of each animation frame:
NumObjectSprites::
.Unknown0:          db $11
.Goomba:            db $22, $22, $22, $22
Since Goombas aren’t into crazy gymnastics, every animation frame simply has the size of 2x2 tiles. In theory 2x1 would also suffice (remember: each sprite is 8x16) but with the anchor of the object being relatively high up, the Goomba would fly over the ground. Also, the number of animation frames is hardcoded to 4 as we are taking the object slot of the boar. Next, object sprite offset pixels need to be defined:
ObjSpritePixelOffsets::
.Unknown0:         db   0,   0
.Goomba:           db   0,   1,   0,   1,   0,   1,   0,   1
These offsets are useful if an object is jumping or dancing, but our short-legged friends don’t have much to offer in that regard. Just a little offset in the Y direction suffices to align the Goomba perfectly with the ground. As a last step, the actual animation needs to be defined. Since there are 4 animation frames, 4 pointers to index sets are needed:
ObjAnimationIndicesPtr::
.Unknown:         dw $0000
.Goomba           dw $0019, $0011, $0019, $0011
As you can see, we let our Goomba switch between two different animations.
The pointers from above point to an entry in ObjAnimationIndices:
ObjAnimationIndices::
.Ind000:          db $02
.Ind001:          db $04, $06, $08, $0a,
.Ind005:          db $14, $16, $18, $1a
.Ind009:          db $0c, $0e, $08, $0a, $1c, $1e, $20, $22
.Ind011:          db $02, $02, $04, $0a, $24, $26, $28, $22
.Ind019:          db $02, $02, $06, $08, $02, $02, $02, $02
Each of these entries is a set of indices that point to a tile in the given sprite palette.
Note that the actual index is calculated by (value - 4) / 2.
If an index is 2, the corresponding tile will be empty.
And that’s already it. If don’t want to change the code yourself, here’s my dev-goomba branch with all the aforementioned changes. Now recompile the game, launch it, and see what happens:
With the appearance now being defined it’s time to give our Goomba a new hitbox - in theory. Because the game defines multiple static hitboxes and some objects share the same hitbox:
HitBoxData::
    db  -4, -12,  4,  -4   ;  $1 = Projectiles
    db  -6, -12,  6,   0   ;  $2 = Pineapple, diamond, ...
    db  -8, -16,  8,   0   ;  $3 = Sitting monkey
    db  -8, -26,  8,   0   ;  $4 = Walking monkey, standing monkey
    db -10, -32, 10,   0   ;  $5 = Cobra
    db -12, -18, 12,   0   ;  $6 = Boar/Goomba, porcupine, armadillo
If we’d change the Goomba’s hitbox, we’d also change the porcupine’s and armadillo’s hitbox. We could add another hitbox, but Bank 1 is already completely full, which means we are slowly descending into rewriting the game for which my autism level doesn’t suffice.
5 Conclusion
So, that’s about it. If you have any corrections or additions, feel free to send me an email :)